Welcome to Microsoft's Windows 7 guide to restoring Windows Vista after installing 7 onto the same drive as Vista, after doing a custom install without formatting the Hard Drive. The best way to see if you have this option is to check the drive for a folder called "Windows.old", inside this folder will be a "Windows" folder, a "Program Files" folder and a "Users" Folder. If these are present then this process is possible. You will need your Windows 7 DVD to complete this process.
|  |
Windows Vista Recovery from Windows 7 Enterprise Install
- Insert Windows 7 Enterprise into DVD drive, and then restart the computer.
- When "Press any key to boot from CD or DVD" appears, press any key.

- Now Select language, time, currency and keyboard input, click "Next" to continue.
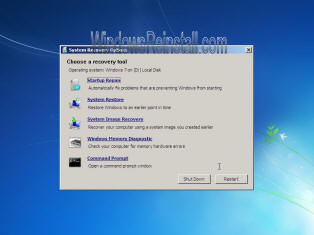
- Now click on "Repair your Computer"

- In the System Recovery Options window you may get a pause as Windows searches for operating systems, click the version of the Windows 7 you wish to remove, and then click Next.
- Click Command Prompt
Move the Windows 7 Enterprise folders to a new Win7 folder - Now Type the following commands and followed by the "ENTER" key.
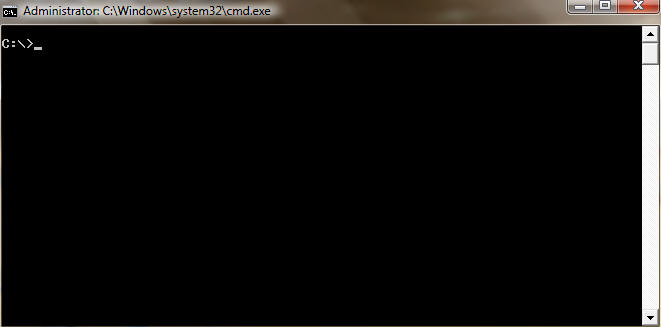
C:
md Win7old
Move Windows Win7old\Windows
Move "Program Files" "Win7old\Program Files"
Move Users Win7old\Users
Attrib –h –s –r ProgramData
Move ProgramData Win7old\ProgramData
Rd "Documents and Settings"
Now to Move the Vista files out of the Windows.old folder - Type the following commands and press ENTER after each command:
move /y c:\Windows.old\Windows c:\
move /y "c:\Windows.old\Program Files" c:\ Attrib –h –s –r c:\Windows.old\ProgramData
move /y c:\Windows.old\ProgramData c:\
move /y c:\Windows.old\Users c:\
move /y "c:\Windows.old\Documents and Settings" c:\
Now restore the boot sector (Windows Vista will not boot without it) - Type the following commands and press ENTER after each command:
DVD:\boot\bootsect /nt60 c:
(NOTE: the letters DVD represent our DVD drive, replace this with the drives letter, ie D: , E: , F: , G: etc etc ) Exit
- Click Restart to restart your computer.
(NOTE: After you have verified that Windows XP is functional, you can remove the C:\Win7old folder if it is not needed)
|